Hybrid
Hybrid Senposai is a variety of Japanese mustard spinach, which belongs to the Mustard genus (Brassica rapa var. komatsuna 'Hybrid Senposai').
This exciting green, developed in Japan, is a cross between Japanese Mustard Spinach (Komatsuna Brassica rapa) and regular cabbage.
It looks like cabbage
Senposai leaves look like cabbage, but unlike cabbage, senposai thrives all summer in full sun with no special care.
Low maintenance plant
As Hybrid Senposai Japanese mustard spinach is a low maintenance plant, it is great for beginner gardeners and those that like gardens that don't need much overseeing. A spring sowing will stand the entire summer (even through drought) and well into fall before bolting. Senposai is resistant to heat and grows well all year round. This fast-growing vegetable can be harvested 30-40 days after sowing.
Tastes great
This unique vegetable has sweet taste of cabbage and tenderness of Komatsuna, excellent for salad, stir-fry and pickling. Excellent sauteed, and it keeps growing back after harvesting.
References:
Senposai http://bit.ly/YFNKDm
Vegetable Matter: Asian Vegetables in Houston http://bit.ly/YFO30Z
Japanese mustard spinach 'Hybrid Senposai' Plant Care & Growing Information | folia http://bit.ly/YFOp7Z
Zen Hybrid Oriental Greens Seeds, Vegetable Gardening at Burpee.com http://bit.ly/YFNEMd
Burpee Gardening Videos - Asian Greens at Burpee.com http://bit.ly/YFNJzl
Fedco Seeds - Item: Senposai http://bit.ly/YFOR6a
Senposai (forum) http://bit.ly/YFP0qd
Planting Spinach in Finger Holes: Raised Bed Gardening - The Rusted Vegetable Garden http://bit.ly/120M7lK
Showing posts with label Vegetables. Show all posts
Showing posts with label Vegetables. Show all posts

Chinese cabbage or Bok Choy
Bok choy is a non-heading cabbage. The Chinese have been cultivating the vegetable for more than 5,000 years. Chinese cabbage (Brassica rapa, subspecies pekinensis and chinensis) is related to the Western cabbage, and is of the same species as the common turnip.
No matter how you spell it, bok choy’s mild flavor is a must for stir fries.
History
A Ming Dynasty herbalist studied the Chinese cabbage for its medicinal qualities around the 14th century. It was introduced to Korea, where it became the staple vegetable for making kimchi. In the early 20th century, it was taken to Japan by returning soldiers who had fought in China during the Russo-Japanese War. Bok choy was introduced to Europe in the 1800's, and is now readily available in supermarkets throughout North America.
Naming variations
The name bok choy is based on the Cantonese word for "white vegetable".
Other than the ambiguous term "Chinese cabbage," the most widely used name in North America for the chinensis variety is bok choy (from Cantonese, literally "white vegetable"; also spelled Pak choi, Bok choi, and Pak choy). In the UK, Australia, South Africa, and other Commonwealth Nations, the term Pak choi is used. Less commonly, the descriptive English names Chinese chard, Chinese mustard, celery mustard, and Spoon cabbage are also employed.
The Chinese commonly refer to bok choy as pak choi or "white vegetable." Another common name is white cabbage.
In China, several terms are commonly used for this vegetable: the majority of Chinese (about 500 million) speak Mandarin, and for them the term is yóu cài (literally "oil vegetable"), since most of the cooking oil in China is extracted from the seed of this plant; Shanghainese speakers (about 90 million in eastern China) use the term qīng cài (literally "blue-green vegetable").
Why to grow
Bok choy deserves a place in every fall garden for these reasons:
- It's fast. Depending on variety, you will wait only 40 days for a head of baby bok choy, or 50 days for a full size variety. Bok choy is especially suited to the shortening days of fall, and its broad leaves have a special talent for making use of dwindling natural light.
- It's nutritious. A one cup serving of cooked bok choy (about half of a baby bok choy) provides all the vitamin A you need in a day, and more than half of your daily quota of vitamin C.
- It's beautiful. Bok choy's thick leaf stems grow so quickly that they seldom suffer injuries, and they make a beautiful green-and-white vegetable on the plate. Red-leafed varieties look stunning in the garden and turn green when they are cooked.
Baby bok choy are dwarf varieties that mature to less than 10 inches ( 25 cm) tall.
When to grow
This Chinese vegetable is a cool weather vegetable. They do not do well during the heat of summer and, therefore, they do best in the spring and fall.
Like other members of the cabbage family, Bok Coy prefers cool, and even cold weather. They can be among the first plants in your garden each spring.
Some people say that bok choy may survive temperatures below 0°F (-18°C) in an unheated greenhouse. In any case, bok choy is an excellent low-light vegetable to grow through winter under protected conditions. It can also be grown under lights indoors in a container using the triple "L" concept ("Lettuce Lights up Living room").
How to Grow Bok Choy
Growing bok choy is done best in cool weather. You can get two crops a year, in the spring and in the fall. They only take 45-50 days to maturity.
Sow seeds and cover lightly with 1/4" of soil or potting mix.
Once your seedlings are 4 inches tall, you will want to thin your growing bok choy to 6-10 inches apart.
Shade
Partial shade can help prevent summer crops from bolting. Ensure your bok choy is not exposed to light for too long, which can lead to bolting. Receiving 16 hours of daily sunlight for a month may cause the plant to flower. Adding shade will also reduce the temperature, thus discouraging bolting. Allow the plant to have 6 to 12 hours of direct sunlight per day.
How to cook
The most classic bok choy cooking method is to stir fry trimmed stalks or halved heads with garlic and ginger.
Video: Baby Bok Choy is a Chinese leaf vegetable commonly used in Chinese cuisine. The vegetable is related to the Western cabbage and of the same species as the common turnip.
References:
Chinese cabbage - Wikipedia http://bit.ly/VDDtJh
Bok Choy - Information and Recipes from About.com http://bit.ly/VDDMUC
Proper Bok Choy Care – Growing Bok Choy http://bit.ly/VDElxD
How to Grow Bok Choy | Guide to Growing Bok Choy http://bit.ly/VDEFwe
Growing Beautiful Bok Choy http://bit.ly/VDFzsD
How to Grow Bok Choy Without Bolting | Home Guides | SF Gate http://bit.ly/VDFWn9
Explore Cornell - Home Gardening - Vegetable Growing Guides - Growing Guide http://bit.ly/VDGCZz
Growing Bok Choy in Containers from Gardenstead - YouTube http://bit.ly/VDGHN0
No matter how you spell it, bok choy’s mild flavor is a must for stir fries.
History
A Ming Dynasty herbalist studied the Chinese cabbage for its medicinal qualities around the 14th century. It was introduced to Korea, where it became the staple vegetable for making kimchi. In the early 20th century, it was taken to Japan by returning soldiers who had fought in China during the Russo-Japanese War. Bok choy was introduced to Europe in the 1800's, and is now readily available in supermarkets throughout North America.
Naming variations
The name bok choy is based on the Cantonese word for "white vegetable".
Other than the ambiguous term "Chinese cabbage," the most widely used name in North America for the chinensis variety is bok choy (from Cantonese, literally "white vegetable"; also spelled Pak choi, Bok choi, and Pak choy). In the UK, Australia, South Africa, and other Commonwealth Nations, the term Pak choi is used. Less commonly, the descriptive English names Chinese chard, Chinese mustard, celery mustard, and Spoon cabbage are also employed.
The Chinese commonly refer to bok choy as pak choi or "white vegetable." Another common name is white cabbage.
In China, several terms are commonly used for this vegetable: the majority of Chinese (about 500 million) speak Mandarin, and for them the term is yóu cài (literally "oil vegetable"), since most of the cooking oil in China is extracted from the seed of this plant; Shanghainese speakers (about 90 million in eastern China) use the term qīng cài (literally "blue-green vegetable").
Why to grow
Bok choy deserves a place in every fall garden for these reasons:
- It's fast. Depending on variety, you will wait only 40 days for a head of baby bok choy, or 50 days for a full size variety. Bok choy is especially suited to the shortening days of fall, and its broad leaves have a special talent for making use of dwindling natural light.
- It's nutritious. A one cup serving of cooked bok choy (about half of a baby bok choy) provides all the vitamin A you need in a day, and more than half of your daily quota of vitamin C.
- It's beautiful. Bok choy's thick leaf stems grow so quickly that they seldom suffer injuries, and they make a beautiful green-and-white vegetable on the plate. Red-leafed varieties look stunning in the garden and turn green when they are cooked.
Baby bok choy are dwarf varieties that mature to less than 10 inches ( 25 cm) tall.
When to grow
This Chinese vegetable is a cool weather vegetable. They do not do well during the heat of summer and, therefore, they do best in the spring and fall.
Like other members of the cabbage family, Bok Coy prefers cool, and even cold weather. They can be among the first plants in your garden each spring.
Some people say that bok choy may survive temperatures below 0°F (-18°C) in an unheated greenhouse. In any case, bok choy is an excellent low-light vegetable to grow through winter under protected conditions. It can also be grown under lights indoors in a container using the triple "L" concept ("Lettuce Lights up Living room").
How to Grow Bok Choy
Growing bok choy is done best in cool weather. You can get two crops a year, in the spring and in the fall. They only take 45-50 days to maturity.
Sow seeds and cover lightly with 1/4" of soil or potting mix.
Once your seedlings are 4 inches tall, you will want to thin your growing bok choy to 6-10 inches apart.
Shade
Partial shade can help prevent summer crops from bolting. Ensure your bok choy is not exposed to light for too long, which can lead to bolting. Receiving 16 hours of daily sunlight for a month may cause the plant to flower. Adding shade will also reduce the temperature, thus discouraging bolting. Allow the plant to have 6 to 12 hours of direct sunlight per day.
How to cook
The most classic bok choy cooking method is to stir fry trimmed stalks or halved heads with garlic and ginger.
Video: Baby Bok Choy is a Chinese leaf vegetable commonly used in Chinese cuisine. The vegetable is related to the Western cabbage and of the same species as the common turnip.
References:
Chinese cabbage - Wikipedia http://bit.ly/VDDtJh
Bok Choy - Information and Recipes from About.com http://bit.ly/VDDMUC
Proper Bok Choy Care – Growing Bok Choy http://bit.ly/VDElxD
How to Grow Bok Choy | Guide to Growing Bok Choy http://bit.ly/VDEFwe
Growing Beautiful Bok Choy http://bit.ly/VDFzsD
How to Grow Bok Choy Without Bolting | Home Guides | SF Gate http://bit.ly/VDFWn9
Explore Cornell - Home Gardening - Vegetable Growing Guides - Growing Guide http://bit.ly/VDGCZz
Growing Bok Choy in Containers from Gardenstead - YouTube http://bit.ly/VDGHN0
Kohlrabi
Ways to cook and use the kohlrabi vegetable by food historian William Woys Weaver (video):
How to Harvest and Prepare Kholrabi. Kholrabi is a great tasting vegetable that grows above ground. It tastes like a cross between sweet cabbage and broccoli. You can eat it raw or use it in a stir-fry. You can also harvest the leaves as you would kale or collards. Once peeled, you can eat it like an apple:
How to Harvest and Prepare Kholrabi. Kholrabi is a great tasting vegetable that grows above ground. It tastes like a cross between sweet cabbage and broccoli. You can eat it raw or use it in a stir-fry. You can also harvest the leaves as you would kale or collards. Once peeled, you can eat it like an apple:
How to Grow Swiss Chard
Chard is a beet that has been chosen for leaf production at the expense of storage root formation.
Chard will produce fresh white, yellow or red leaf stalks. It is an attractive ornamental that adds color to the vegetable garden.
Chard goes by many names—Swiss chard, leaf beet, seakettle beet, and spinach beet to name a few. It is a beautiful large-leaf vegetable with wide flat stems resembling celery. The ruby variety is especially charming with its' vivid red stem with broad dark green leaves. If you like spinach, you will adore chard. The flavor is mild yet earthy and sweet with slightly bitter undertones.
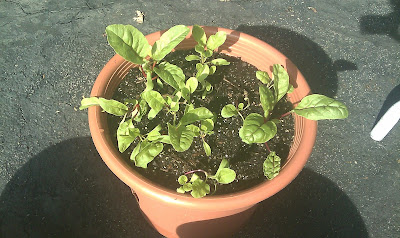
Baby Swiss chard in SIP
The word "Swiss" was used to distinguish chard from French charde or chardon by nineteenth century seed catalogues publishers and the name stuck. Chard is very popular among Mediterranean cooks but the first varieties have been traced back to Sicily. In the US the leaves are valued while European cooks value the stalks to the point of discarding the leaves or feeding them to animals.
Swiss chard is a cool-season vegetable that prefers sunny locations and fertile, well-drained soil. Swiss chard tastes best when plants grow rapidly and mature before the heat of summer. Irrigation should be frequent to ensure good growth.
Swiss chard comes in a variety of leaf colors. Planting a range of different types makes salads and meals more interesting.
How to Grow Swiss Chard
Soil Preparation: Before planting, incorporate 2-4 inches of well-composted organic matter or apply 4-6 cups of all-purpose fertilizer (16-16-8 or 10-10-10) per 100 square feet. Work this into the top 6 inches of soil.
Swiss chard can be sown after soils reach 40°F.
Seeds germinate best at 55-75°F and require 7-14 days to emerge. Temperatures above 80°F reduce seed germination. Seeds should be planted ½-1 inch deep. Thin stands when plants have 3-4 true leaves.
Planting and Spacing: Seeded or transplanted Swiss chard should be spaced 6 inches between plants in the row with rows 12 inches apart. Swiss chard grows best when temperatures do not exceed 75°F. Temperatures down to 32°F do not seriously damage young plants. Transplants should be planted near the last frost-free date for the growing area. Seeded Swiss chard may be planted 3-4 weeks earlier.
High summer temperatures reduce growth, decrease quality, and may cause bitter or off-flavors to develop.
For fall Swiss chard, select early maturing cultivars and plant 50-75 days before the anticipated maturity date. The maturity date should be about 2-3 weeks before the first fall frost. Plants can be left in the garden after light frosts.
Water: Water chard regularly supplying 1-2 inches per week.
Fertilization: Apply 1/4 cup per 10 foot of row of a nitrogen-based fertilizer (21-0-0) 4 weeks after transplanting or thinning to encourage rapid plant growth. Place the fertilizer to the side of the plants and irrigate it into the soil.
When is the best time to plant Swiss chard?
Swiss chard should be planted 2-3 weeks before the anticipated last frost in the spring. Plant 3-4 weeks before the anticipated first frost in the fall for an autumn crop.
References:
Vegetables for a Fall Garden in the Midwest
Swiss chard is multipurpose plant - LSU AgCenter video http://bit.ly/Sg5XSI
Swiss Chard in the Garden - extension.usu.edu http://bit.ly/Sg6B2x
Chard - Vegetable Directory - Watch Your Garden Grow - University of Illinois Extension http://bit.ly/Sg6Tq9
Chard or Swiss Chard - LSU AgCenter http://bit.ly/Sg6JPL
How to Grow Chard » Harvest to Table http://bit.ly/16D9rWo
In My Kitchen Garden: How To Grow Your Own Swiss Chard From Seed & Why You Should http://goo.gl/EJn9f
How to Grow Swiss Chard | Veggie Gardener http://bit.ly/WPQ5yq
Chard will produce fresh white, yellow or red leaf stalks. It is an attractive ornamental that adds color to the vegetable garden.
Chard goes by many names—Swiss chard, leaf beet, seakettle beet, and spinach beet to name a few. It is a beautiful large-leaf vegetable with wide flat stems resembling celery. The ruby variety is especially charming with its' vivid red stem with broad dark green leaves. If you like spinach, you will adore chard. The flavor is mild yet earthy and sweet with slightly bitter undertones.
Baby Swiss chard in SIP
The word "Swiss" was used to distinguish chard from French charde or chardon by nineteenth century seed catalogues publishers and the name stuck. Chard is very popular among Mediterranean cooks but the first varieties have been traced back to Sicily. In the US the leaves are valued while European cooks value the stalks to the point of discarding the leaves or feeding them to animals.
Swiss chard is a cool-season vegetable that prefers sunny locations and fertile, well-drained soil. Swiss chard tastes best when plants grow rapidly and mature before the heat of summer. Irrigation should be frequent to ensure good growth.
Swiss chard comes in a variety of leaf colors. Planting a range of different types makes salads and meals more interesting.
How to Grow Swiss Chard
Soil Preparation: Before planting, incorporate 2-4 inches of well-composted organic matter or apply 4-6 cups of all-purpose fertilizer (16-16-8 or 10-10-10) per 100 square feet. Work this into the top 6 inches of soil.
Swiss chard can be sown after soils reach 40°F.
Seeds germinate best at 55-75°F and require 7-14 days to emerge. Temperatures above 80°F reduce seed germination. Seeds should be planted ½-1 inch deep. Thin stands when plants have 3-4 true leaves.
Planting and Spacing: Seeded or transplanted Swiss chard should be spaced 6 inches between plants in the row with rows 12 inches apart. Swiss chard grows best when temperatures do not exceed 75°F. Temperatures down to 32°F do not seriously damage young plants. Transplants should be planted near the last frost-free date for the growing area. Seeded Swiss chard may be planted 3-4 weeks earlier.
High summer temperatures reduce growth, decrease quality, and may cause bitter or off-flavors to develop.
For fall Swiss chard, select early maturing cultivars and plant 50-75 days before the anticipated maturity date. The maturity date should be about 2-3 weeks before the first fall frost. Plants can be left in the garden after light frosts.
Water: Water chard regularly supplying 1-2 inches per week.
Fertilization: Apply 1/4 cup per 10 foot of row of a nitrogen-based fertilizer (21-0-0) 4 weeks after transplanting or thinning to encourage rapid plant growth. Place the fertilizer to the side of the plants and irrigate it into the soil.
When is the best time to plant Swiss chard?
Swiss chard should be planted 2-3 weeks before the anticipated last frost in the spring. Plant 3-4 weeks before the anticipated first frost in the fall for an autumn crop.
References:
Vegetables for a Fall Garden in the Midwest
Swiss chard is multipurpose plant - LSU AgCenter video http://bit.ly/Sg5XSI
Swiss Chard in the Garden - extension.usu.edu http://bit.ly/Sg6B2x
Chard - Vegetable Directory - Watch Your Garden Grow - University of Illinois Extension http://bit.ly/Sg6Tq9
Chard or Swiss Chard - LSU AgCenter http://bit.ly/Sg6JPL
How to Grow Chard » Harvest to Table http://bit.ly/16D9rWo
In My Kitchen Garden: How To Grow Your Own Swiss Chard From Seed & Why You Should http://goo.gl/EJn9f
How to Grow Swiss Chard | Veggie Gardener http://bit.ly/WPQ5yq
What to Plant in a Fall Vegetable Garden
You can find out what you can plant at any moment using the calculator available at SproutRobot: http://bit.ly/159mzCW
Plant CLeaR in your fall vegetable garden:
Cabbage
Leafy plants - Lettuce, bok choi, chard
Root crops - Radish, beet, turnip
Remember to add a handful of homemade compost to each square foot before you plant.
1. Cabbages
The first group to be planted in the fall would be the cabbage family, and that would include different types of cabbage, like red or green with different leaf patterns. Next would be:
Broccoli
Cauliflower
Brussel sprouts
2. Leafy plants - Lettuce, bok choi, chard
The second group of fall cool weather planting would be all of the leaf plants like lettuce and spinach. There are many different colors, shapes, and varieties in the seed catalogs. Look for some that are particularly cold-resistant and you’ll be able to carry them right into the winter. They don’t grow fast in the cold weather, so you won’t have as large a harvest, but you will still be successful.
3. Root crops - Radish, beet, turnip.
All kinds of carrots, beets, and radishes can be planted in the fall. Don’t forget to save your unused seeds in a Ziploc bag in a refrigerator so they’re ready for next spring. All root crops are best grown from seeds planted directly into the garden where they will grow rather than from transplants.
The root crops can be remembered by the mnemonic RBT ("rabbit"): Radish, Beet, Turnip.
What NOT to do
Don’t plant any of the summer warm weather crops, like:
Tomatoes
Peppers
Eggplants
Squashes
Cucumbers
Here is how it looks in real life:
UME Master Gardener shows off his food garden and speaks about when he plants and harvests his fall vegetables:
"What to Grow" Plan for August-September for Illinois
An example for 6 sub-irrigated planters (12-inch):
1. Radish (22 days to harvest)
2. Turnip (40 days)
3. Lettuce (45 days, you can start earlier if using as microgreens)
4. Swiss chard (50 days)
5. Parsley (50 days)
6. Swiss chard, radish or turnip
Potting mix
Add potting mix/soil, fertilizer in the mix, plus a fertilizer band at the top. I add vermiculite to the commercial potting mixes available at The Home Depot such as Miracle Gro Organic Choice. A good option is to mix 2/3 potting mix with 1/3 coarse grade vermiculite. For Chicago, a local retailer called Brew & Grow sells a 40-lb pound of vermiculite for $24. I add organic dry powder fertilizer made of fish.
Plastic "mulch" cover
Some people place a plastic "mulch" cover at the top but in my experience this causes mold to develop below the cover. You can still use the plastic mulch method when transplanting larger plants such as tomato or pepper in the spring. The DIY version of the plastic mulch cover can be made easily and cheaply from a black trash bag. Cut holes for planting through it. One large trash bag is enough for six 12-inch planters.
Fall Seed Kit suggested by Mel Bartholomew, the creator of Square Foot Gardening http://bit.ly/PyLBrL
Here are the seeds suggested by Mel:
Plant -- Variety -- Days to Harvest
Spinach -- Tyee 45
Turnips -- Tokyo 40
Radish -- Cherry Belle 22
Swiss Chard -- Lucullus 60
Loose Leaf Lettuce -- Red Fire 29
Loose Leaf Lettuce -- Black Seeded Simpson 45
Beets -- Ruby Queen 55
Bibb Lettuce -- Buttercrunch 68
Scallions -- Evergreen 65
Leek -- Lincoln 50
Carrots -- Nantes 70
Peas Super -- Sugar Snap 66
Cool-season Crops - WSU - Organic Farm http://goo.gl/cU1pI
Hardy
Asparagus
Broad Bean
Broccoli
Brussels sprouts
Cabbage
Chive
Collards
Garlic
Asparagus
Horseradish
Kale
Kohlrabi
Leek
Mustard
Onion
Parsley
Pea
Radish
Rhubarb
Spinach
Turnip
Parsnip
Potato
Salsify
Half-hardy
Beet
Carrot
Cauliflower
Celery
Chard
Chicory
Chinese cabbage
Globe artichoke
Endive
Lettuce
References:
Vegetables for a Fall Garden in the Midwest
Here is how to plan what to plant according you where you live: Average First and Last Frost Dates by State http://goo.gl/6Bc8P
Free Seed Starting Calculator - free, downloadable Excel spreadsheet from PlanterTomato website http://goo.gl/HtHn0
How To Plan A Fall Square Foot Garden | Mel Bartholomew, Creator of Square Foot Gardening http://goo.gl/14ywG
Eat Live Grow Paleo: GROW http://goo.gl/zpWXE
Fall 2011 Square Foot Gardening Plan | My Square Foot Garden http://goo.gl/DwY8t
Fall and Winter Vegetable Planting Guide - Ed Hume http://bit.ly/RQ8sKf -- What to Grow for a Family of Four http://bit.ly/RQ8vG4
Monthly Garden Projects - Ed Hume's Year-round Gardening Projects Calendar http://goo.gl/z98HA
Fall Winter Chart for Planting - Westcoastseeds.com (PDF) http://bit.ly/11QWzJd
Recommended Crops to Plant Mid to Late Summer to Harvest in Fall - Johnny Seeds http://bit.ly/13EhG8o
Plant CLeaR in your fall vegetable garden:
Cabbage
Leafy plants - Lettuce, bok choi, chard
Root crops - Radish, beet, turnip
Remember to add a handful of homemade compost to each square foot before you plant.
1. Cabbages
The first group to be planted in the fall would be the cabbage family, and that would include different types of cabbage, like red or green with different leaf patterns. Next would be:
Broccoli
Cauliflower
Brussel sprouts
2. Leafy plants - Lettuce, bok choi, chard
The second group of fall cool weather planting would be all of the leaf plants like lettuce and spinach. There are many different colors, shapes, and varieties in the seed catalogs. Look for some that are particularly cold-resistant and you’ll be able to carry them right into the winter. They don’t grow fast in the cold weather, so you won’t have as large a harvest, but you will still be successful.
3. Root crops - Radish, beet, turnip.
All kinds of carrots, beets, and radishes can be planted in the fall. Don’t forget to save your unused seeds in a Ziploc bag in a refrigerator so they’re ready for next spring. All root crops are best grown from seeds planted directly into the garden where they will grow rather than from transplants.
The root crops can be remembered by the mnemonic RBT ("rabbit"): Radish, Beet, Turnip.
What NOT to do
Don’t plant any of the summer warm weather crops, like:
Tomatoes
Peppers
Eggplants
Squashes
Cucumbers
Here is how it looks in real life:
UME Master Gardener shows off his food garden and speaks about when he plants and harvests his fall vegetables:
"What to Grow" Plan for August-September for Illinois
An example for 6 sub-irrigated planters (12-inch):
1. Radish (22 days to harvest)
2. Turnip (40 days)
3. Lettuce (45 days, you can start earlier if using as microgreens)
4. Swiss chard (50 days)
5. Parsley (50 days)
6. Swiss chard, radish or turnip
Potting mix
Add potting mix/soil, fertilizer in the mix, plus a fertilizer band at the top. I add vermiculite to the commercial potting mixes available at The Home Depot such as Miracle Gro Organic Choice. A good option is to mix 2/3 potting mix with 1/3 coarse grade vermiculite. For Chicago, a local retailer called Brew & Grow sells a 40-lb pound of vermiculite for $24. I add organic dry powder fertilizer made of fish.
Plastic "mulch" cover
Some people place a plastic "mulch" cover at the top but in my experience this causes mold to develop below the cover. You can still use the plastic mulch method when transplanting larger plants such as tomato or pepper in the spring. The DIY version of the plastic mulch cover can be made easily and cheaply from a black trash bag. Cut holes for planting through it. One large trash bag is enough for six 12-inch planters.
Fall Seed Kit suggested by Mel Bartholomew, the creator of Square Foot Gardening http://bit.ly/PyLBrL
Here are the seeds suggested by Mel:
Plant -- Variety -- Days to Harvest
Spinach -- Tyee 45
Turnips -- Tokyo 40
Radish -- Cherry Belle 22
Swiss Chard -- Lucullus 60
Loose Leaf Lettuce -- Red Fire 29
Loose Leaf Lettuce -- Black Seeded Simpson 45
Beets -- Ruby Queen 55
Bibb Lettuce -- Buttercrunch 68
Scallions -- Evergreen 65
Leek -- Lincoln 50
Carrots -- Nantes 70
Peas Super -- Sugar Snap 66
Cool-season Crops - WSU - Organic Farm http://goo.gl/cU1pI
Hardy
Asparagus
Broad Bean
Broccoli
Brussels sprouts
Cabbage
Chive
Collards
Garlic
Asparagus
Horseradish
Kale
Kohlrabi
Leek
Mustard
Onion
Parsley
Pea
Radish
Rhubarb
Spinach
Turnip
Parsnip
Potato
Salsify
Half-hardy
Beet
Carrot
Cauliflower
Celery
Chard
Chicory
Chinese cabbage
Globe artichoke
Endive
Lettuce
References:
Vegetables for a Fall Garden in the Midwest
Here is how to plan what to plant according you where you live: Average First and Last Frost Dates by State http://goo.gl/6Bc8P
Free Seed Starting Calculator - free, downloadable Excel spreadsheet from PlanterTomato website http://goo.gl/HtHn0
How To Plan A Fall Square Foot Garden | Mel Bartholomew, Creator of Square Foot Gardening http://goo.gl/14ywG
Eat Live Grow Paleo: GROW http://goo.gl/zpWXE
Fall 2011 Square Foot Gardening Plan | My Square Foot Garden http://goo.gl/DwY8t
Fall and Winter Vegetable Planting Guide - Ed Hume http://bit.ly/RQ8sKf -- What to Grow for a Family of Four http://bit.ly/RQ8vG4
Monthly Garden Projects - Ed Hume's Year-round Gardening Projects Calendar http://goo.gl/z98HA
Fall Winter Chart for Planting - Westcoastseeds.com (PDF) http://bit.ly/11QWzJd
Recommended Crops to Plant Mid to Late Summer to Harvest in Fall - Johnny Seeds http://bit.ly/13EhG8o
How To Plant and Grow Lettuce
Lettuce is a Cool Season Vegetable (Salad Greens, Lactuca sativa from Asteraceae Family). Not native to North America - Mediterranean origin. Was cultivated by Egyptians 6,500 years ago.
With the variety of colors, shapes and flavors available, your salads may never be the same. Lettuce is adapatable to many growing conditions, but likes it cool - around 60 F to 65 F. Grow in spring and fall, and slow bolting by shading summer crops.
Sunlight: Yields best in full sun. Part shade helpful when it’s hot. Will withstand light to moderate frost.
Lettuce grows great indoors, or outdoors, in simple Kratky hydroponic containers.
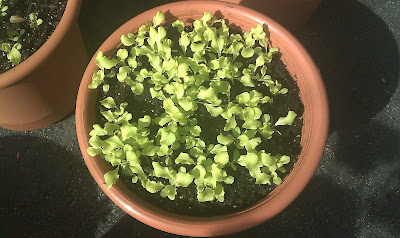
Black Seeded Simpson lettuce in SIP.
How to plant
Propagate by seed. Best germination is below 70 F. Days to emergence: 7 to 14. Germinates in about a week at 50 F, 2 days at 70 F. It may fail to germinate if above 85 F.
Direct seed or transplant in early spring, as soon as you can work the soil.
Direct-seeding: Sow seed 1/8 inch deep, 1 inch apart in rows 12 to 18 inches apart. When plants have two or three true leaves, thin to 12-inch spacings for crisphead varieties, 6 to 10 inches for other types.
Seeds need light to germinate, so do not plant too deep. Make succession plantings every week or two.
Lettuce has a shallow root system. Keep soil moist to keep plants growing continuously.
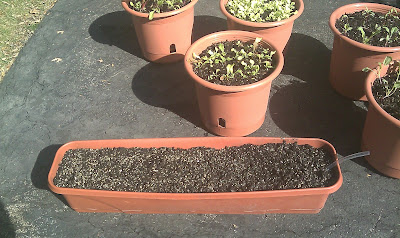
Window box turned into a SIP for growing lettuce
Fertilizing Greens
The nutrients your leafy greens need are available in:
- commercial fertilizers such as 5-10-10 or 10-10-10
- organic fertilizers like bonemeal, bloodmeal and dehydrated manures
The numbers 5-10-10 or 10-10-10 refer to the percentages of nitrogen (N), phosphorus (P) and potassium (K) in the bag of fertilizer. They are always listed in that order, too: N-P-K.
Plants need more than just 3 major plant nutrients to grow normally. Secondary plant nutrients, such as magnesium, zinc and iron, are also important, but usually needed only in small quantities. Most soils contain these minor elements, but mixing compost or other organic matter, such as composted manure, into the soil helps to insure their presence. Alternatively, you can add rockdust or Azomite.
Toss the fertilizer over an area as evenly as possible. You don't want to get a lot of the commercial fertilizer or dried manure in one place. Always mix the fertilizer into the top two to three inches of soil before planting.
“Up, Down and All-Around” is another way to think about NPK and the numbering system for fertilizers. Your lawn needs nitrogen for the leaves’ color and growth, phosphorous for strong roots, and potassium for overall health. Source: Home Depot.
Learn how to plant and grow lettuce from Burpee's expert horticulturist:
Here are some Burpee lettuce seeds I planted this year. There were available for $1.00 each at Home Depot:
Black-Seeded Simpson Lettuce
HEIRLOOM. Even after 150 years it's one of the most tender leaf lettuces. Hugely popular for over 150 years, it's one of the most tender and delicately flavored leaf lettuces ever bred. The ruffled leaves are large with an appealing green color. 'Simpson' is well adapted to a wide range of climates and is still the best for early spring sowing.
Days to Maturity: 45 days
Sun: Full Sun
Sowing Method: Direct Sow/Indoor Sow
Spread: 6 inches
Height: 9-15 inches
Thinning: 8 inches
Gourmet Blend Lettuce
Burpee Exclusive, popular looseleaf blend, selected for a long harvest. Fast-growing, tender, colorful, and tolerant of hot weather. Grows best in cool weather. Can also be grown as a fall crop. Protect from heat with shade cloth. Likes fertile soil, ample water. Best when picked minutes before your meal. Space lettuce plants 8" apart. 500 seeds per packet, will plant about 30 ft of row; one oz. sows 400 ft. Grows best in full sun.
Days to Maturity: 45-50 days
Sun: Full Sun
Sowing Method: Direct Sow/Indoor Sow
Spread: 6 inches
Height: 9-15 inches
Thinning: 8 inches
Varieties
There are 5 types of lettuce:
- Looseleaf (var. crispa) - Easy to grow. Matures quickly. You can start harvesting leaves as soon as 4 weeks after planting. Great for early-season plantings. Wide variety of leaf shapes and colors. 45 to 60 days to full maturity.
- Butterhead (bib, loosehead, Boston) - Exceptionally good flavor and quality. Forms loose heads with oily leaves. 55 to 75 days to maturity.
- Romaine (Cos, var. longfolia) - Upright, elongated heads. (Some grow nearly 2 feet tall.) More tolerant of warm weather and less likely to bolt than other lettuce types. Red varieties as well as traditional light green. Most take about 70 days to mature.
- French (summer crisp) - Midway between butterhead and crisphead. You can harvest early like leaf lettuce or wait until heads form. 50 to 75 days.
- Crisphead (iceberg, var. capitata) - The familiar spherical heads found in grocery stores. Most difficult varieties to grow. Requires long cool season. Will bolt quickly in response to stress. 75 or more days.
Recommended varieties:
Looseleaf:
Black Seeded Simpson
Green Ice
Ibis
Lollo Rossa
New Red Fire
Oak Leaf
Prizehead
Red Sails
Ruby
Salad Bowl
Slobolt
Romaine:
Cosmo Savoy
Green Towers
Little Gem
Parris Island
Valmaine (a.k.a Paris White or Valmaine Savoy)
Butterhead:
Buttercrunch
Esmerelda
Four Seasons
Sangria
Winter Density
Container Garden Raised Bed Square Foot Gardening (video):
Here is his recipe for success: There are 6 holes drilled in the bottom of this storage container ($4-8 at Walmart/Target, etc.), each about half inch wide. Water on once a day at 6 pm. Sometimes lift the container to get an idea of how much water is in the soil. Water with fertilizer solution once every 7-10 days, e.g. fish emulsion fertilizer 5-1-1 mixed 1 tablespoon per gallon.
Related:
Vegetables for a Fall Garden in the Midwest
Four Season Garden #4: Planting Lettuce in an EarthBox - YouTube http://goo.gl/AhNzE
Four Season Garden #3: Starting Seeds - YouTube - http://goo.gl/RUz9s
Explore Cornell - Home Gardening - Vegetable Growing Guides - Growing Guide http://goo.gl/at6J0
Solving Lettuce Problems - Gardening Articles :: Edibles :: Vegetables :: National Gardening Association - http://goo.gl/zLZXB
Growing Salad Greens in Window Boxes - Gardening Articles :: Edibles :: Vegetables :: National Gardening Association - http://goo.gl/jlTJt
Lettuce Essentials - Gardening Articles :: Edibles :: Vegetables :: National Gardening Association - http://goo.gl/Sr1xg
Plant Lettuce Now for Winter Greens - Gardening Articles :: Edibles :: Vegetables :: National Gardening Association - http://goo.gl/SGGXh
With the variety of colors, shapes and flavors available, your salads may never be the same. Lettuce is adapatable to many growing conditions, but likes it cool - around 60 F to 65 F. Grow in spring and fall, and slow bolting by shading summer crops.
Sunlight: Yields best in full sun. Part shade helpful when it’s hot. Will withstand light to moderate frost.
Lettuce grows great indoors, or outdoors, in simple Kratky hydroponic containers.
Black Seeded Simpson lettuce in SIP.
How to plant
Propagate by seed. Best germination is below 70 F. Days to emergence: 7 to 14. Germinates in about a week at 50 F, 2 days at 70 F. It may fail to germinate if above 85 F.
Direct seed or transplant in early spring, as soon as you can work the soil.
Direct-seeding: Sow seed 1/8 inch deep, 1 inch apart in rows 12 to 18 inches apart. When plants have two or three true leaves, thin to 12-inch spacings for crisphead varieties, 6 to 10 inches for other types.
Seeds need light to germinate, so do not plant too deep. Make succession plantings every week or two.
Lettuce has a shallow root system. Keep soil moist to keep plants growing continuously.
Window box turned into a SIP for growing lettuce
Fertilizing Greens
The nutrients your leafy greens need are available in:
- commercial fertilizers such as 5-10-10 or 10-10-10
- organic fertilizers like bonemeal, bloodmeal and dehydrated manures
The numbers 5-10-10 or 10-10-10 refer to the percentages of nitrogen (N), phosphorus (P) and potassium (K) in the bag of fertilizer. They are always listed in that order, too: N-P-K.
Plants need more than just 3 major plant nutrients to grow normally. Secondary plant nutrients, such as magnesium, zinc and iron, are also important, but usually needed only in small quantities. Most soils contain these minor elements, but mixing compost or other organic matter, such as composted manure, into the soil helps to insure their presence. Alternatively, you can add rockdust or Azomite.
Toss the fertilizer over an area as evenly as possible. You don't want to get a lot of the commercial fertilizer or dried manure in one place. Always mix the fertilizer into the top two to three inches of soil before planting.
“Up, Down and All-Around” is another way to think about NPK and the numbering system for fertilizers. Your lawn needs nitrogen for the leaves’ color and growth, phosphorous for strong roots, and potassium for overall health. Source: Home Depot.
Learn how to plant and grow lettuce from Burpee's expert horticulturist:
Here are some Burpee lettuce seeds I planted this year. There were available for $1.00 each at Home Depot:
Black-Seeded Simpson Lettuce
HEIRLOOM. Even after 150 years it's one of the most tender leaf lettuces. Hugely popular for over 150 years, it's one of the most tender and delicately flavored leaf lettuces ever bred. The ruffled leaves are large with an appealing green color. 'Simpson' is well adapted to a wide range of climates and is still the best for early spring sowing.
Days to Maturity: 45 days
Sun: Full Sun
Sowing Method: Direct Sow/Indoor Sow
Spread: 6 inches
Height: 9-15 inches
Thinning: 8 inches
Gourmet Blend Lettuce
Burpee Exclusive, popular looseleaf blend, selected for a long harvest. Fast-growing, tender, colorful, and tolerant of hot weather. Grows best in cool weather. Can also be grown as a fall crop. Protect from heat with shade cloth. Likes fertile soil, ample water. Best when picked minutes before your meal. Space lettuce plants 8" apart. 500 seeds per packet, will plant about 30 ft of row; one oz. sows 400 ft. Grows best in full sun.
Days to Maturity: 45-50 days
Sun: Full Sun
Sowing Method: Direct Sow/Indoor Sow
Spread: 6 inches
Height: 9-15 inches
Thinning: 8 inches
Varieties
There are 5 types of lettuce:
- Looseleaf (var. crispa) - Easy to grow. Matures quickly. You can start harvesting leaves as soon as 4 weeks after planting. Great for early-season plantings. Wide variety of leaf shapes and colors. 45 to 60 days to full maturity.
- Butterhead (bib, loosehead, Boston) - Exceptionally good flavor and quality. Forms loose heads with oily leaves. 55 to 75 days to maturity.
- Romaine (Cos, var. longfolia) - Upright, elongated heads. (Some grow nearly 2 feet tall.) More tolerant of warm weather and less likely to bolt than other lettuce types. Red varieties as well as traditional light green. Most take about 70 days to mature.
- French (summer crisp) - Midway between butterhead and crisphead. You can harvest early like leaf lettuce or wait until heads form. 50 to 75 days.
- Crisphead (iceberg, var. capitata) - The familiar spherical heads found in grocery stores. Most difficult varieties to grow. Requires long cool season. Will bolt quickly in response to stress. 75 or more days.
Recommended varieties:
Looseleaf:
Black Seeded Simpson
Green Ice
Ibis
Lollo Rossa
New Red Fire
Oak Leaf
Prizehead
Red Sails
Ruby
Salad Bowl
Slobolt
Romaine:
Cosmo Savoy
Green Towers
Little Gem
Parris Island
Valmaine (a.k.a Paris White or Valmaine Savoy)
Butterhead:
Buttercrunch
Esmerelda
Four Seasons
Sangria
Winter Density
Container Garden Raised Bed Square Foot Gardening (video):
Here is his recipe for success: There are 6 holes drilled in the bottom of this storage container ($4-8 at Walmart/Target, etc.), each about half inch wide. Water on once a day at 6 pm. Sometimes lift the container to get an idea of how much water is in the soil. Water with fertilizer solution once every 7-10 days, e.g. fish emulsion fertilizer 5-1-1 mixed 1 tablespoon per gallon.
Related:
Vegetables for a Fall Garden in the Midwest
Four Season Garden #4: Planting Lettuce in an EarthBox - YouTube http://goo.gl/AhNzE
Four Season Garden #3: Starting Seeds - YouTube - http://goo.gl/RUz9s
Explore Cornell - Home Gardening - Vegetable Growing Guides - Growing Guide http://goo.gl/at6J0
Solving Lettuce Problems - Gardening Articles :: Edibles :: Vegetables :: National Gardening Association - http://goo.gl/zLZXB
Growing Salad Greens in Window Boxes - Gardening Articles :: Edibles :: Vegetables :: National Gardening Association - http://goo.gl/jlTJt
Lettuce Essentials - Gardening Articles :: Edibles :: Vegetables :: National Gardening Association - http://goo.gl/Sr1xg
Plant Lettuce Now for Winter Greens - Gardening Articles :: Edibles :: Vegetables :: National Gardening Association - http://goo.gl/SGGXh
Hungarian wax pepper
The Hungarian wax pepper (sometimes called Hungarian Yellow Wax Banana) is a medium variety of Capsicum annuum with a wide Scoville Scale range of 1,000 to 15,000 Scoville units.
This pepper is usually harvested before maturity when still yellow. It measures between 4"-6" inches in length (102 mm-152 mm) which tapers to a rounded point. Upon maturity, the pepper becomes orange then red in color (as all peppers). Although similar in appearance to banana peppers when immature, it is a different cultivar.
Due to the ease of cultivation and the productivity of the plant, many home gardeners pickle these whole or sliced in rings. These peppers have a sweet, but hot flavor that make them a favorite in many dishes. Hungarian wax peppers are shaped like a carrot, they taper to a rounded point and averages about 6" in length and about 1 1/2" wide. It is considered an early pepper that produces excellent yields on a 24" plant.
In June, I bought a small plant from a local nursery for 80 cents. The plant had 2 fruits when bought and has not grown much in height as of August 1st. I tried one of the peppers and it was not hot. It was easy to dry some of the seeds and I will see if I can grow the pepper from seed next year.
Hungarian Wax Peppers are a creamy-yellow translucent color, very similar to the Banana Wax Pepper. However, these two peppers differ in heat, color and size. The Hungarian Wax has a thin skin with a thick flesh due to its immaturity. Picked at an immature stage, the Hungarian Wax Pepper is yellow and has a sweet hot flavor varying from warm to moderately hot. During the 65 day Hungarian Wax Pepper maturing stage the color changes to an orange-red and the heat rises to an almost inedible intense heat while keeping its sweetness.
Although the pepper can be eaten at any stage, the Hungarian Wax Pepper is most popular in the yellow stages. This pepper is traditionally pickled or made into yellow mole sauces.
The pepper is great for pickling or drying. It is canary yellow turning to bright red when ripe. Harvest starts about 70 days after setting out plants.
Sun: Full Sun
Sowing Method: Indoor Sow
Days to Maturity: 70 days
Height: 18-24 inches
Spread: 16 inches
How to Sow Peppers
Most U.S. gardeners (apart from those living in the Deep South) start pepper plants indoors about 8-10 weeks before transplanting, which should be done 2-3 weeks after the expected last frost. Start indoors in a warm, well-lighted area. Place containers in a south facing window or under grow lights until seedlings emerge. Sow 1-2 seeds 1/4" deep into individual containers filled with seed starting formula. Keep moist. Seedlings emerge in 10-21 days at 75-80 degrees Fahrenheit.
For Illinois, the average last frost is April 15 and average first frost is October 15. Sow by March 15-April 15. Transplant outdoors by May 15-June 15. Peppers are self pollinators.
Fertilizer
As the peppers develop, switch over to a fertilizer higher in Phosphorous and Potassium. Gardeners often make the mistake of providing too much nitrogen. The result is a great looking bushy, green plant, but few fruit.
Days to Maturity
Most peppers take 60 to 80 days to mature.
References:
Wikipedia http://en.wikipedia.org/wiki/Hungarian_wax_pepper
Hungarian Wax Peppers | Melissa's Produce http://goo.gl/r521y
Hot Hungarian Wax Pepper Seeds and Plants, Vegetable Gardening at Burpee.com http://goo.gl/5jaKp
All about peppers - Urban Farmer's Guide http://goo.gl/h2zvM
Peppers - YouTube http://goo.gl/9VcP0
My pepper garden ... - YouTube http://goo.gl/qaouF
How to Grow Peppers - YouTube http://goo.gl/syHPV
Container Peppers by Nurse Amy (video) http://goo.gl/zgDqk
This pepper is usually harvested before maturity when still yellow. It measures between 4"-6" inches in length (102 mm-152 mm) which tapers to a rounded point. Upon maturity, the pepper becomes orange then red in color (as all peppers). Although similar in appearance to banana peppers when immature, it is a different cultivar.
Due to the ease of cultivation and the productivity of the plant, many home gardeners pickle these whole or sliced in rings. These peppers have a sweet, but hot flavor that make them a favorite in many dishes. Hungarian wax peppers are shaped like a carrot, they taper to a rounded point and averages about 6" in length and about 1 1/2" wide. It is considered an early pepper that produces excellent yields on a 24" plant.
In June, I bought a small plant from a local nursery for 80 cents. The plant had 2 fruits when bought and has not grown much in height as of August 1st. I tried one of the peppers and it was not hot. It was easy to dry some of the seeds and I will see if I can grow the pepper from seed next year.
Hungarian Wax Peppers are a creamy-yellow translucent color, very similar to the Banana Wax Pepper. However, these two peppers differ in heat, color and size. The Hungarian Wax has a thin skin with a thick flesh due to its immaturity. Picked at an immature stage, the Hungarian Wax Pepper is yellow and has a sweet hot flavor varying from warm to moderately hot. During the 65 day Hungarian Wax Pepper maturing stage the color changes to an orange-red and the heat rises to an almost inedible intense heat while keeping its sweetness.
Although the pepper can be eaten at any stage, the Hungarian Wax Pepper is most popular in the yellow stages. This pepper is traditionally pickled or made into yellow mole sauces.
The pepper is great for pickling or drying. It is canary yellow turning to bright red when ripe. Harvest starts about 70 days after setting out plants.
Sun: Full Sun
Sowing Method: Indoor Sow
Days to Maturity: 70 days
Height: 18-24 inches
Spread: 16 inches
How to Sow Peppers
Most U.S. gardeners (apart from those living in the Deep South) start pepper plants indoors about 8-10 weeks before transplanting, which should be done 2-3 weeks after the expected last frost. Start indoors in a warm, well-lighted area. Place containers in a south facing window or under grow lights until seedlings emerge. Sow 1-2 seeds 1/4" deep into individual containers filled with seed starting formula. Keep moist. Seedlings emerge in 10-21 days at 75-80 degrees Fahrenheit.
For Illinois, the average last frost is April 15 and average first frost is October 15. Sow by March 15-April 15. Transplant outdoors by May 15-June 15. Peppers are self pollinators.
Fertilizer
As the peppers develop, switch over to a fertilizer higher in Phosphorous and Potassium. Gardeners often make the mistake of providing too much nitrogen. The result is a great looking bushy, green plant, but few fruit.
Days to Maturity
Most peppers take 60 to 80 days to mature.
References:
Wikipedia http://en.wikipedia.org/wiki/Hungarian_wax_pepper
Hungarian Wax Peppers | Melissa's Produce http://goo.gl/r521y
Hot Hungarian Wax Pepper Seeds and Plants, Vegetable Gardening at Burpee.com http://goo.gl/5jaKp
All about peppers - Urban Farmer's Guide http://goo.gl/h2zvM
Peppers - YouTube http://goo.gl/9VcP0
My pepper garden ... - YouTube http://goo.gl/qaouF
How to Grow Peppers - YouTube http://goo.gl/syHPV
Container Peppers by Nurse Amy (video) http://goo.gl/zgDqk
How to grow parsley
Common parsley (Petroselinium crispum) is a member of the carrot family (Apiaceae). Parsley (Petroselinum crispum) is a member of the carrot family that is native to Europe.
The two most popular types of parsley are:
- curly leaf parsley (Petroselinium crispum)
- flat leaf or Italian parsley (Petroselinium neapolitanum)
History
Parsley is thought to have originated in Sardinia, but the plant has been altered significantly by cultivation. In mythology, parsley was believed to have sprung from a Greek hero, Archemorous, the forerunner of death. Greeks crowned winners at the Isthmian games with parsley, and warriors fed the leaves to their horses.
The ancient Greeks and Romans knew parsley well as a medicinal plant and as a seasoning. Native to the Mediterranean area, parsley has a biennial life cycle, but is usually grown as an annual in the U.S. because the plants often die during cold winters.
Where to plant
As with most herbs, parsley does best in a sunny area which receives direct light for 6-8 hours a day, although it can tolerate some light shade. Parsley grows best in full sun.
The plants can be interspersed around the edges of the garden and along pathways.
Seeds
Germination is notoriously slow. The rate of germination is dependent upon seed freshness, ranging from 2-5 weeks. To help hasten the process, soak the seeds in warm water for 24 hours prior to planting.
Seeds can be started indoors in the late winter approximately 6-8 weeks ahead of the last frost date. Seeds can also be sown directly in the ground where they are to be grown, after danger of spring frosts has passed.
How to plant
Cover seeds with 1/8 inch of soil, and keep them moist. Since germination is so slow, it’s a good idea to mark the rows. Emerging seedlings will appear almost grass-like, with two narrow seed leaves opposite each other. Thin or transplant seedlings when they are 2-3 inches high.
Parsley planted in the fall is far more productive than when planted in the spring.
When planting seeds into the garden, cover them with a quarter-inch to a half-inch of soil. Water lightly every day, and the seeds should be up in 10 to 14 days. After three or four weeks, when the sprouts are a few inches tall and have several leaves, thin seedlings growing in the garden to allow about 10 inches between the plants. If desired, extras can be transplanted to other spots.
Watering
Do not allow the plants to dry out completely between waterings in the garden. Water deeply at least once a week.
Fertilizer
Fertilize plants in garden beds once or twice during the growing season, using a 5-10-5 commercial fertilizer. Use a liquid fertilizer at one half the label recommended strength every 3-4 weeks for container grown plants outside and every 4-6 weeks for parsley grown indoors.
Fill the container with moistened potting mix and add some slow-release fertilizer – or plan to water the plants twice a month with a soluble fertilizer.
Harvest
Begin harvesting parsley when it produces leaf stems with 3 segments. Begin harvesting parsley when it has grown to about 8 inches in diameter and has numerous leaves. Harvest the larger, lower leaves at the outside of the plant – leaving the newer interior shoots to mature. Generally, remove no more than one-third to one-half of the foliage at any one time.
Indoor growing
Parsley is an easy herb to grow indoors as long as it has a bright location and holes in the bottom of the pot to insure good drainage. The plants may be a bit spindly when grown indoors; this is due to lower light levels.
Varieties
- The most common variety is curly parsley, Petroselinium crispum. They quite versatile, typically growing 8-14 inches tall, forming dense clumps which are great for borders, interplanting in the garden beds, and indoor or outdoor containers.
- Italian flat-leaf parsley, P. neapolitanum is another popular variety. This plant can grow quite tall (2-3 ft) and is more gangly in habit. The flat serrated leaves have a much stronger and sweeter flavor than the other varieties, making it more desirable for cooking.
- Hamburg parsley, P. tuberosum, is mainly grown for its white, fleshy, parsnip-like roots, used in flavoring soups. Tall, fern-like leaves make up the foliage.
References:
Growing Parsley - University of Minnesota http://goo.gl/5byFl
Growing Parsley in Louisiana - LSU AgCenter http://goo.gl/78vYZ
Parsley — Herbs — Penn State Extension http://goo.gl/ulaVD
Parsley, sage, cilantro, basil, thyme, chives, and mint are some of the best container herbs - Whole Foods Market http://bit.ly/16Qlcxf
Splitting Daisy, Parsley and Chamomile Transplants: MFG 2014 - YouTube http://buff.ly/1kYPJy6
Parsley: Garnish or Superfood? | Planet Natural http://buff.ly/1jVdAQl
Related reading:
Article: A Cases of Near-fatal Anaphylaxis: Parsley “Over-use” as an Herbal Remedy bit.ly/1v4xafa Free Full Text
The two most popular types of parsley are:
- curly leaf parsley (Petroselinium crispum)
- flat leaf or Italian parsley (Petroselinium neapolitanum)
History
Parsley is thought to have originated in Sardinia, but the plant has been altered significantly by cultivation. In mythology, parsley was believed to have sprung from a Greek hero, Archemorous, the forerunner of death. Greeks crowned winners at the Isthmian games with parsley, and warriors fed the leaves to their horses.
The ancient Greeks and Romans knew parsley well as a medicinal plant and as a seasoning. Native to the Mediterranean area, parsley has a biennial life cycle, but is usually grown as an annual in the U.S. because the plants often die during cold winters.
Where to plant
As with most herbs, parsley does best in a sunny area which receives direct light for 6-8 hours a day, although it can tolerate some light shade. Parsley grows best in full sun.
The plants can be interspersed around the edges of the garden and along pathways.
Seeds
Germination is notoriously slow. The rate of germination is dependent upon seed freshness, ranging from 2-5 weeks. To help hasten the process, soak the seeds in warm water for 24 hours prior to planting.
Seeds can be started indoors in the late winter approximately 6-8 weeks ahead of the last frost date. Seeds can also be sown directly in the ground where they are to be grown, after danger of spring frosts has passed.
How to plant
Cover seeds with 1/8 inch of soil, and keep them moist. Since germination is so slow, it’s a good idea to mark the rows. Emerging seedlings will appear almost grass-like, with two narrow seed leaves opposite each other. Thin or transplant seedlings when they are 2-3 inches high.
Parsley planted in the fall is far more productive than when planted in the spring.
When planting seeds into the garden, cover them with a quarter-inch to a half-inch of soil. Water lightly every day, and the seeds should be up in 10 to 14 days. After three or four weeks, when the sprouts are a few inches tall and have several leaves, thin seedlings growing in the garden to allow about 10 inches between the plants. If desired, extras can be transplanted to other spots.
Watering
Do not allow the plants to dry out completely between waterings in the garden. Water deeply at least once a week.
Fertilizer
Fertilize plants in garden beds once or twice during the growing season, using a 5-10-5 commercial fertilizer. Use a liquid fertilizer at one half the label recommended strength every 3-4 weeks for container grown plants outside and every 4-6 weeks for parsley grown indoors.
Fill the container with moistened potting mix and add some slow-release fertilizer – or plan to water the plants twice a month with a soluble fertilizer.
Harvest
Begin harvesting parsley when it produces leaf stems with 3 segments. Begin harvesting parsley when it has grown to about 8 inches in diameter and has numerous leaves. Harvest the larger, lower leaves at the outside of the plant – leaving the newer interior shoots to mature. Generally, remove no more than one-third to one-half of the foliage at any one time.
Indoor growing
Parsley is an easy herb to grow indoors as long as it has a bright location and holes in the bottom of the pot to insure good drainage. The plants may be a bit spindly when grown indoors; this is due to lower light levels.
Varieties
- The most common variety is curly parsley, Petroselinium crispum. They quite versatile, typically growing 8-14 inches tall, forming dense clumps which are great for borders, interplanting in the garden beds, and indoor or outdoor containers.
- Italian flat-leaf parsley, P. neapolitanum is another popular variety. This plant can grow quite tall (2-3 ft) and is more gangly in habit. The flat serrated leaves have a much stronger and sweeter flavor than the other varieties, making it more desirable for cooking.
- Hamburg parsley, P. tuberosum, is mainly grown for its white, fleshy, parsnip-like roots, used in flavoring soups. Tall, fern-like leaves make up the foliage.
References:
Growing Parsley - University of Minnesota http://goo.gl/5byFl
Growing Parsley in Louisiana - LSU AgCenter http://goo.gl/78vYZ
Parsley — Herbs — Penn State Extension http://goo.gl/ulaVD
Parsley, sage, cilantro, basil, thyme, chives, and mint are some of the best container herbs - Whole Foods Market http://bit.ly/16Qlcxf
Splitting Daisy, Parsley and Chamomile Transplants: MFG 2014 - YouTube http://buff.ly/1kYPJy6
Parsley: Garnish or Superfood? | Planet Natural http://buff.ly/1jVdAQl
Related reading:
Article: A Cases of Near-fatal Anaphylaxis: Parsley “Over-use” as an Herbal Remedy bit.ly/1v4xafa Free Full Text
How to Grow Radishes
The radish belongs to the mustard, or Brassicaceae, family, which encompasses vegetables as diverse as broccoli and watercress.
Radish is a cool-season, fast-maturing, easy-to-grow vegetable. Radishes can be grown even on the smallest city lot. Radishes are easy and quick to grow. Cool weather is essential for best radish quality because they become "hot" and woody in hot weather.
October is a good time to plant winter radishes, and they are easy to grow.
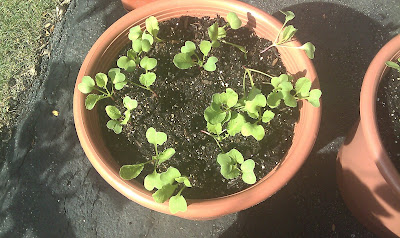
Radishes in SIP
Seeds
Don’t look for radish transplants at your local nursery. Radishes, like all root crops, are best grown from seeds planted directly into the garden where they will grow.
Sow seed 1/4 inch deep in rows 12 inches or more apart. Radishes should be thinned to allow 2 to 3 inches between plants. Make several small plantings at 7-10-day intervals because radishes are in prime condition for only a few days.
Harvest radishes when roots are 1/2 to 1 inch in diameter. Radishes remain in edible condition for only a short time. Wash roots, trim both taproot and tops, and store in plastic bags in the refrigerator. They will keep up to a month.
When to Plant
Radishes can be classified according to the length of the growing time from sowing to harvest. Short-season cultivars are easy to grow and quick to mature. They are a joy for gardeners anxious to have fresh vegetables for a fall salad, since they are ready to harvest in only 21-30 days from the time seed is sown.
These short-season radishes require cool soil to germinate and mild air temperatures to develop well. They can be planted from October through early April (although you might have to protect young plants from freeze damage if temperatures drop into the teens during the winter).
Spring radishes should be planted from as early as the soil can be worked until mid-spring. Make successive plantings of short rows every 10 to 14 days. Plant in spaces between slow-maturing vegetables (such as broccoli and brussels sprouts) or in areas that will be used later for warm-season crops (peppers, tomatoes and squash).
Spring radishes also can be planted in late winter in a protected cold frame, window box or container in the house or on the patio.
Long-season radishes are much larger and slower to mature (50 to 70 days) than short-season varieties.
These later-maturing varieties of radishes (Icicle or French Breakfast) usually withstand heat better than the early maturing varieties and are recommended for late-spring planting for summer harvest. Winter radishes require a much longer time to mature than spring radishes and are planted at the same time as late turnips (usually midsummer to late summer).
Fertilizer
To enrich the soil, add well-rotted compost or manure and work a general-purpose fertilizer into the soil before planting the seeds.
Watering
Radishes sprout in a matter of days, but they need a constant supply of water to do so. A steady supply of water – at least an inch a week – will ensure rapid, steady growth.
Care
Radishes grow well in almost any soil that is fertilized before planting and has adequate moisture maintained.
Radishes mature rapidly under favorable conditions and should be checked often for approaching maturity. Harvest should begin as soon as roots reach edible size and should be completed quickly.
Harvesting
Pull radishes when they are of usable size (usually staring when roots are less than 1 inch in diameter) and relatively young. Proper thinning focuses the harvest and avoids disappointing stragglers that have taken too long to develop.
Winter varieties mature more slowly and should be harvested at considerably larger size. Once they reach maturity, they maintain high quality for a fairly long time in the garden, especially in cool fall weather.
Plan on sowing small amounts of seed every week or 10 days rather that raising one large crop.
Potential problems: Why do my radishes grow all tops with no root development?
There may be several reasons: seed planted too thickly and plants not thinned (extreme crowding), weather too hot for the spring varieties that do best in cool temperatures (planted too late or unseasonable weather).
Radishes may seem like a "fool-proof" vegetable to grow but as usual the reality is a little more nuanced than the theory. On several occasions, the radishes I planted in raised garden beds became "leggy", weak and never formed a bulb. There were several reasons: not enough soon, dry and compacted soil.
Planting radish in square foot garden (video):
Planting Radishes/Preparing the Soil and Seed Spacing: My 1st Vegetable Garden - MFVG - YouTube http://bit.ly/15MVhBk
Radish : Minowase, Champion & White Icicle : Growing & Harvesting
References:
Radish Essentials - National Gardening Association http://goo.gl/vVUUI
Radish Varieties - National Gardening Association http://goo.gl/IybF3
Radish - Vegetable Directory - Watch Your Garden Grow - University of Illinois Extension http://goo.gl/sX2Lf
Get It Growing: Radishes Are Easy To Grow - LSU AgCenter http://goo.gl/Tuwbl
Radish Growing Problems: Troubleshooting | Harvest to Table http://bit.ly/QbMIfa and How to Grow Radish | Harvest to Table http://bit.ly/QbMGEa
Vegetables for a Fall Garden in the Midwest
Radishes: Early Season Favorite | Planet Natural http://buff.ly/1sG5X0F
Rover radishes withstand heat and can be grown in the subtropical climate of South Florida:
Radish is a cool-season, fast-maturing, easy-to-grow vegetable. Radishes can be grown even on the smallest city lot. Radishes are easy and quick to grow. Cool weather is essential for best radish quality because they become "hot" and woody in hot weather.
October is a good time to plant winter radishes, and they are easy to grow.
Radishes in SIP
Seeds
Don’t look for radish transplants at your local nursery. Radishes, like all root crops, are best grown from seeds planted directly into the garden where they will grow.
Sow seed 1/4 inch deep in rows 12 inches or more apart. Radishes should be thinned to allow 2 to 3 inches between plants. Make several small plantings at 7-10-day intervals because radishes are in prime condition for only a few days.
Harvest radishes when roots are 1/2 to 1 inch in diameter. Radishes remain in edible condition for only a short time. Wash roots, trim both taproot and tops, and store in plastic bags in the refrigerator. They will keep up to a month.
When to Plant
Radishes can be classified according to the length of the growing time from sowing to harvest. Short-season cultivars are easy to grow and quick to mature. They are a joy for gardeners anxious to have fresh vegetables for a fall salad, since they are ready to harvest in only 21-30 days from the time seed is sown.
These short-season radishes require cool soil to germinate and mild air temperatures to develop well. They can be planted from October through early April (although you might have to protect young plants from freeze damage if temperatures drop into the teens during the winter).
Spring radishes should be planted from as early as the soil can be worked until mid-spring. Make successive plantings of short rows every 10 to 14 days. Plant in spaces between slow-maturing vegetables (such as broccoli and brussels sprouts) or in areas that will be used later for warm-season crops (peppers, tomatoes and squash).
Spring radishes also can be planted in late winter in a protected cold frame, window box or container in the house or on the patio.
Long-season radishes are much larger and slower to mature (50 to 70 days) than short-season varieties.
These later-maturing varieties of radishes (Icicle or French Breakfast) usually withstand heat better than the early maturing varieties and are recommended for late-spring planting for summer harvest. Winter radishes require a much longer time to mature than spring radishes and are planted at the same time as late turnips (usually midsummer to late summer).
Fertilizer
To enrich the soil, add well-rotted compost or manure and work a general-purpose fertilizer into the soil before planting the seeds.
Watering
Radishes sprout in a matter of days, but they need a constant supply of water to do so. A steady supply of water – at least an inch a week – will ensure rapid, steady growth.
Care
Radishes grow well in almost any soil that is fertilized before planting and has adequate moisture maintained.
Radishes mature rapidly under favorable conditions and should be checked often for approaching maturity. Harvest should begin as soon as roots reach edible size and should be completed quickly.
Harvesting
Pull radishes when they are of usable size (usually staring when roots are less than 1 inch in diameter) and relatively young. Proper thinning focuses the harvest and avoids disappointing stragglers that have taken too long to develop.
Winter varieties mature more slowly and should be harvested at considerably larger size. Once they reach maturity, they maintain high quality for a fairly long time in the garden, especially in cool fall weather.
Plan on sowing small amounts of seed every week or 10 days rather that raising one large crop.
Potential problems: Why do my radishes grow all tops with no root development?
There may be several reasons: seed planted too thickly and plants not thinned (extreme crowding), weather too hot for the spring varieties that do best in cool temperatures (planted too late or unseasonable weather).
Radishes may seem like a "fool-proof" vegetable to grow but as usual the reality is a little more nuanced than the theory. On several occasions, the radishes I planted in raised garden beds became "leggy", weak and never formed a bulb. There were several reasons: not enough soon, dry and compacted soil.
Planting radish in square foot garden (video):
Planting Radishes/Preparing the Soil and Seed Spacing: My 1st Vegetable Garden - MFVG - YouTube http://bit.ly/15MVhBk
Radish : Minowase, Champion & White Icicle : Growing & Harvesting
References:
Radish Essentials - National Gardening Association http://goo.gl/vVUUI
Radish Varieties - National Gardening Association http://goo.gl/IybF3
Radish - Vegetable Directory - Watch Your Garden Grow - University of Illinois Extension http://goo.gl/sX2Lf
Get It Growing: Radishes Are Easy To Grow - LSU AgCenter http://goo.gl/Tuwbl
Radish Growing Problems: Troubleshooting | Harvest to Table http://bit.ly/QbMIfa and How to Grow Radish | Harvest to Table http://bit.ly/QbMGEa
Vegetables for a Fall Garden in the Midwest
Radishes: Early Season Favorite | Planet Natural http://buff.ly/1sG5X0F
Rover radishes withstand heat and can be grown in the subtropical climate of South Florida:
Subscribe to:
Posts (Atom)